three.js is a very capable Javascript 3D engine. There are a ton of cool examples out there to learn from, but sadly little in the way of documentation.
This article aims to give you a macro view of three.js, hopefully bestowing you with enough context to explore the parts that excite you in more depth, on your own. You should expect to have to experiment with code examples and read the resources for clarification.
It’s a friendly shove in the right direction, if you will, rather than a guided tour!
If you’d prefer a guided tour, check out the Getting Started link in the Resources section.
Ingredients
- three.js is updated pretty regularly, so I’d recommend that you clone the git repository but you can download the latest minified build if you prefer.
- WebGL capable browser; Chrome is my weapon of choice. Firefox also has good support, don’t get me started on Internet Explorer. (it’s a steaming turd!)
- Your willingness to experiment. Play around with the examples, change parameters, tweak colours.. learn by doing!
Code Snippets
The examples are hosted at JSFiddle, allowing you to experiment with the code from within your browser. Most of the code will be heavily commented, don’t panic if it doesn’t make sense at first!
O hai, world!
Here’s an example hierarchy of objects from a typical three.js world:

Let’s run through these objects, working from the bottom up. The links to the API docs will be more useful later:
Vertices THREE.Vertex
An array of points in 3D space, each point having an x, y and z coordinate.
Faces THREE.Face3
An array of polygons in 3D space (typically triangles) constructed from a number of vertices from the vertex array.
Geometry THREE.Geometry
A collection of vertices and the faces that are constructed from those points.
Material THREE.Material
The visual properties we want our object to have. e.g. colour, shininess, texture, opacity, etc.
Mesh THREE.Mesh
I like to think of a mesh as a scene object. A mesh is a combination of geometry and material that allows us to position, scale and rotate everything in one operation. To clarify: imagine trying to move your coffee cup if its atoms could not be manipulated as one!
Light THREE.Light
Light sources tell three.js how to illuminate the scene. Lights include point, ambient, directional and spot.
Scene THREE.Scene
A collection of meshes and lights.
Camera THREE.Camera
Pretty much what it sounds like. It’s our eyeball into the scene, positioned in 3D space and pointed in a particular direction. The most commonly used camera is a THREE.PerspectiveCamera.
Renderer THREE.WebGLRenderer
Given a scene and a camera, renders the scene from the given camera perspective onto the underlying canvas.
World Coordinates and Cameras
Our default world is a 3D dimensional space where coordinates are given by an x, y and z position. Let’s measure distances in the world using units, where one unit is an arbitrary real-world amount.
Tip: Don’t think of units in terms of pixels!
Remember that size on screen is a factor of both size in units and distance from the eye/camera.
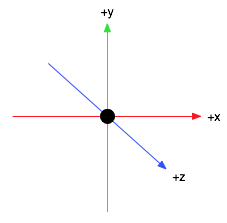
The centre of the world is the origin, which happens to be the point (0, 0, 0)
Here’s what the default coordinate system looks like:

The origin is the black dot in the middle.
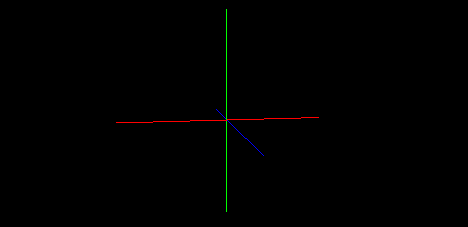
Let’s play with some code (click the image):

Objects/Meshes
As alluded to previously, a mesh can be manipulated as if it were a single object.
We can change its position in the world, rotate it, and scale it.
Tip: Rotation angles are given in radians!
Long story short you can convert degrees to radians, thusly:
angle_in_radians = angle_in_degrees * Math.PI / 180;See ‘Radians Primer’ in the resources section for more information.
Playtime!

Lighting
Different types of light are available, and you can add multiple lights to a scene.
Tip: No lights?
Those paying attention will notice that we’ve not added lights in examples up to this point. If you don’t add a light, three.js (effectively) adds one for you. Not all materials require a light-source to be visible.
Directional lights THREE.DirectionalLight
Look at the sun.. wait! I mean, consider the sun. It’s a light source, it’s pretty far away, and its light hits the earth in a particular direction. It’s a directional light source.
In three.js you specify the position of the light as a unit vector. A unit vector is a vector with a length of one unit. You can turn any vector into a unit vector by dividing through by its length, this process is called normalisation.
The hard work has (again) been done for us:
  var v = new Vector3(10, 0, 0);
  v.normalize(); // v is now a unit vector
If this is new to you, and you’re interested, check out the normalisation tutorial in the resources section.
The position vector should specify the direction that we want the light to come from, the head points toward the origin. e.g. if the tail of the vector is to the right (1, 0, 0) and pointing toward the origin (0, 0, 0) then the light will shine toward the left.
Note that distance from the light source is largely irrelevant.
Point lights THREE.PointLight
A point light is light coming from a specific location in the world space, emitted in all directions simultaneously.
The distance from the light determines how much the light ‘brightens’ an object.
Ambient lights THREE.AmbientLight
Ambient light is the average of light from all other light sources. The has the effect of brightening entire objects evenly.
Ambient lights have no effect if there are no other light sources in the scene, for obvious reasons :)
Move the mouse about in this one:

Materials
We’ll only be covering a couple of basic materials, I’d be lying if I said I understand them all!
Basic Material THREE.MeshBasicMaterial
Basic materials aren’t affected by light, they’re effectively a solid colour.
Lambert Material THREE.MeshLambertMaterial
A lambert material is affected by light, proportional to the angle between the incoming light and the normals of the surface. We won’t be covering surface normals, but suffice it to say that light shining directly onto the surface has more of an affect than light hitting it at an angle.
Tip: Material options
Colours
It’s possible to set the material colour using HSV, this is sometimes an easier when you need a rainbow:
  var material = new THREE.MeshLambertMaterial({color: 0xffffff});
  material.color.setHSV(0.5, 1.0, 1.0);
Wireframes
Sometimes wireframe is the look you’re going for, everyone loves retro. Enable wireframe mode by setting wireframe: true in your material configuration object.
It’s worth digging around in the THREE.Material API doc for other goodies!
Texture maps
We won’t be giving a texture mapped example, because of silly cross-domain permissions errors while trying to pull textures from domains outside of JSFiddle. Here’s some code instead:
  // Load the texture image
  var textureImage = THREE.ImageUtils.loadTexture("square-outline-textured.png");
  // Tell three.js to wrap the texture in both directions
  textureImage.wrapT = textureImage.wrapS = THREE.RepeatWrapping;
  var material = new THREE.MeshBasicMaterial({map: textureImage});
Warning: Power-of-two!
WebGL requires texture dimensions to be power of 2 in a lot of cases. Better to err on the side of caution.

Primitive Objects
three.js usefully caters for the mathematical creation of many primitive objects, we already saw a cube! Others include spheres, cubes, planes and more:

You Try!
Experiment with the following primitives, if you’re in doubt about a parameter then play with the numbers!
THREE.SphereGeometry THREE.PlaneGeometry THREE.CylinderGeometry THREE.TorusKnotGeometry
Rendering Text
Given a text string and set of properties, three.js will produce 3D geometry that we can manipulate like any other:

Particle systems
Particle systems are a lot of fun to play with, but sadly well beyond the scope of this article.. so I’ll simply refer you this superb tutorial by Seb Lee-Delisle.
Shaders
If you see something particularly bad-ass, you can be fairly sure that there’s some shader trickery behind it. Shaders are small programs written using the GL Shader Language that run directly on your graphics card.
Shaders allow for per-vertex and per-pixel modification of the geometry that’s been sent to the graphics card. There are tons of cool examples out there, but I particularly like this one.
Paul Lewis wrote an excellent two part primer on shaders, I’ve linked to both parts in the resource section.
Phew!
That’s your lot!
I found it really difficult to boil such a large topic down to just one article, and there are still a number of glaring omissions that I’ll leave for another time.
Lastly, it’d be remiss of me to not to thank mrdoob (and the many other contributors) for three.js. It’s awesome!
