
I love the build up to Christmas. Waiting for the big day is full of exciting anticipation. What’s under the tree? How much food will I be able to eat? Who will get a little tipsy and fall asleep on the sofa first? I love waiting for Christmas day.
Do you know what I don’t love waiting for? Websites to load. White pages in the browser, spinning animated gifs, the many reflows of a slow loading site; all things that bring tears to my eyes. Over the last couple of years there has been a real focus on site performance from the luminaries of the web and those that take performance seriously have responded well. Follow all the common advice these days and you will have a snappy loading site and happy visitors.
But is there more? Can we squeeze performance out of anywhere else in the site? I think so.
Enter the Service Worker
First released in Chrome 40, right at the start of 2015, Service Workers heralded the best chance we have of building solid, offline first websites. But with the power to run in the background and intercept network requests I believe Service Workers have a lot more to offer than the lofty goal of rebuilding our sites to work offline.
(If you haven’t read up about them yet, take a look through the HTML5Rocks introduction to Service Workers and you’ll be up to speed.)
Today, we’re going to take a site I built and use a Service Worker to improve the performance of the site’s page loads.
Countdown to Christmas
As I so enjoy waiting for Christmas day, I built a simple site that counts down to Christmas day. You can check out the source to the site, before we start any work on it, on GitHub.
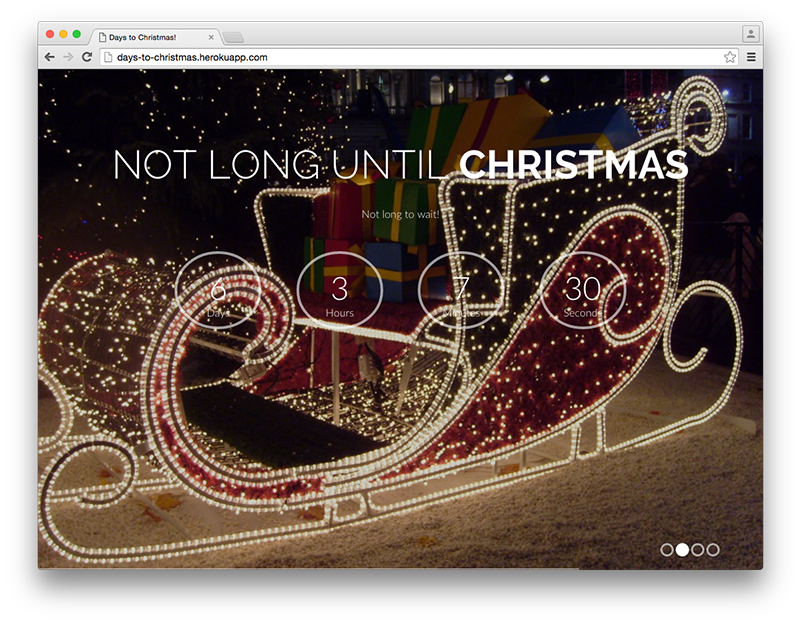
It’s just a bootstrap theme (that I found courtesy of BlackTie) with a bit of JavaScript that performs the countdown and slides images about. I am not here to knock the theme, but it wasn’t built with performance in mind. That’s nothing against the theme creator, different projects have different goals. It does make it easy to illustrate how we can help using the Service Worker though.
Caveats
I do need to jump in right now, firstly Service Worker, at the time of writing, is still only available in Chrome and Opera. To get the benefit of a Service Worker it needs to be installed by a site, so the first page load will never have a live worker. And finally, your site will need to run over HTTPS (though with the release of Let’s Encrypt, this should be easier to set up if you haven’t already).
So, Service Workers, with some of the techniques below, can be used to speed up a site further. However, like all JavaScript techniques, they are an enhancement so you will need to do the basics well too, this just gives you even more!
Running the app
If you want to follow along with the process of adding a Service Worker to this application, check out the git repository at the pre-service-worker tag. You can run the application by cloning from GitHub, installing the dependencies and starting up the Node.js server:
$ git clone https://github.com/philnash/days-to-christmas.git
$ cd days-to-christmas
$ git checkout pre-service-worker
$ npm install
$ npm start
You can visit your local version of the app at http://localhost:3000.
Installing the Service Worker
Service Workers are pieces of code that run outside the context of a website. In order to use a Service Worker we must install it from our site. We will check whether the browser supports Service Workers and then attempt to install. I’m going to do this on our index.html page in a script tag, so as not to incur any further HTTP requests.
Add this script element to the bottom of the page, just above the analytics script.
This script reports in the console whether our Service Worker was installed correctly. I’ve already included the file in the repo, along with a polyfill for some methods that make working with caches easier. You can find our starter file at public/sw.js.
You’ll notice that instead of success and failure callbacks for when the Service Worker completes registration we are using Promises. If you haven’t already jumped aboard the Promises train (or sleigh, if we’re going to be seasonal) then I recommend a read through this introduction to Promises as there will be many on their way.
Refresh the page and you should see “Service Worker registered” in the console. As we add things to the worker itself we’re going to need to load the new worker into the page. The easiest way I’ve found to do this and see the results immediately is to have Chrome’s Service Worker internals (chrome://serviceworker-internals/) page open. When you want to load a new Service Worker, close the site then click the “unregister” button. Next time you load the page, your latest Service Worker will be loaded up.
The Service Worker internals page is also useful as it allows you to open up dev tools for the worker itself, in which you can access a console in the context of the worker or check network requests.
The install event
Once we install our Service Worker we can start using it. The first thing we’re going to do to speed up our page loads is cache our static resources, the CSS and JavaScript that we’re using to render and run the page. When a Service Worker is installed for the first time, the install event runs and we can use this to prime the worker’s cache with files.
Jump into public/sw.js and let’s write our install event handler.
const mainCache = "dtc-cache";

// self refers to the Service Worker itself within this file.
self.addEventListener("install", function(event) {
  // waitUntil takes a Promise and doesn't finish the event until the Promise fulfils.
  event.waitUntil(
    // Open the cache
    caches.open(mainCache).then(function(cache) {
      // cache.addAll returns a Promise so this event won't be over until all the files are added.
      return cache.addAll([
        "/css/bootstrap.css",
        "/css/main.css",
        "/css/soon.css",
        "/js/soon/custom.js",
        "/js/soon/jquery.themepunch.revolution.min.js",
        "/js/soon/plugins.js",
        "/js/bootstrap.min.js",
        "/js/jquery.min.js",
        "/js/modernizr.custom.js",
        "/js/respond.min.js"
      ]);
    })
  );
});
All this does is name our cache and pump all the CSS and JavaScript files into it. Fairly straightforward. In order to benefit from our cache we need to start intercepting requests and serving from the cache ourselves.
The fetch event
The magic of the Service Worker is its ability to intercept network requests and decide what to do with them. The first thing we can do with this is return our cached files instead of making the browser go to the network to fetch them. So let’s set up our fetch event to check that the browser is looking for CSS or JS and return the response straight from the cache.
self.addEventListener("fetch", function(event) {
  const requestURL = new URL(event.request.url);

  // If we are requesting something from our CSS or JavaScript directories, we'll use the worker to respond, otherwise it can drop through to act as a normal request.
  if (/^(\/css\/|\/js\/)/.test(requestURL.pathname)) {
    event.respondWith(function() {
      // Open up the cache
      return caches.open(mainCache).then(function(cache) {
        // Try to match the request against the files in the cache
        return cache.match(event.request).then(function(cacheResponse) {
          // If the cache matched, cacheResponse will be our file, otherwise fetch it from the network
          return cacheResponse || fetch(request);
        });
      });
    });
  }
});
Let’s walk through what the code above does. We set up to listen for the fetch event that is triggered by the page. When we get a fetch event we create a URL object from the request itself. Then we test against the URL’s path to see if it is something that is being requested from the /css or /js directory. If it isn’t the request falls through the Service Worker and is served as usual.
If we are looking for one of the files we had cached earlier we open up that cache. This returns a Promise (I told you there would be more) which is resolved with the cache object itself. We then try to match the incoming request to the files in that cache. Once more, this returns a Promise which resolves with the response. If the file is in the cache, then we can return that response to the browser. If it isn’t then we can use the fetch API to send the request on. As long as we return a Response object or a Promise that eventually resolves with a Response object we fulfil the role of the network.
If you refresh your Service Worker and reload the page the first time the new Service Worker will be installed. Refresh again and if you inspect the Network tab in Chrome dev tools you’ll see that all of our CSS and JS were served from the Service Worker.
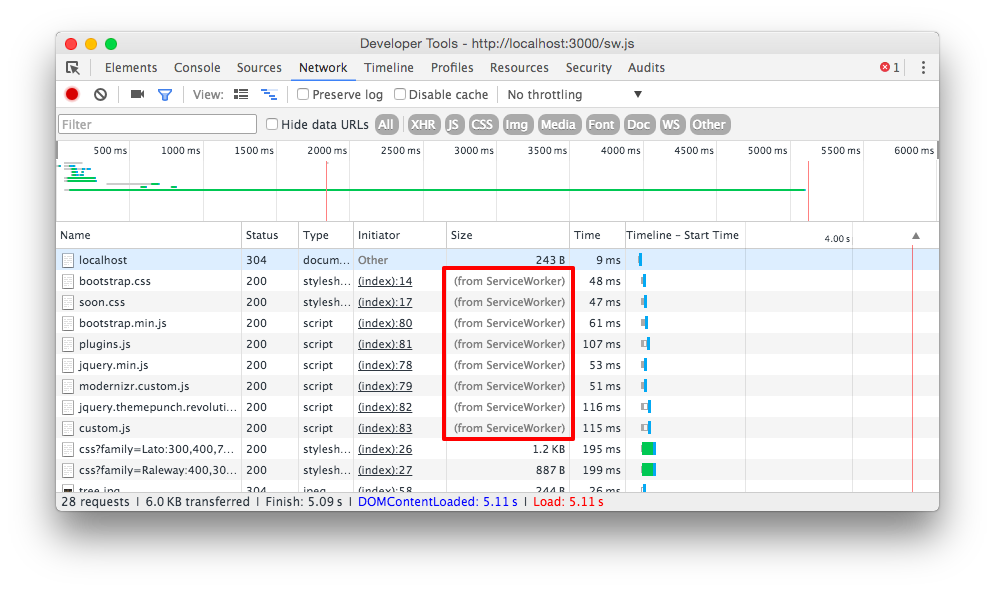
Cached forever!
We now no longer have to hit the network in order to get all these static assets. Fantastic! There is a problem though. What if we wanted to make the header a bit bigger, really emphasise how close we are to Christmas? We could drop into public/css/soon.css and increase the font-size on the h1, reload the page and… reload the page again and…
Ok, we’ve now cached all our static files and they are staying cached, never reaching out to the network again to check for updates. We need to fix this.
Cache management
There are 2 approaches to this. Typically the advice is to maintain caches and then clear them out when an update is made. You can do this using the activate event. This event is fired after the install event and is mainly used to tidy caches up. If we were to use this method, we’d version our cache name and then clear out any old caches during activation.
const mainCache = "dtc-cache-v1";

self.addEventListener("install", function(event) {
  event.waitUntil(
    caches.open(mainCache).then(function(cache) {
      return cache.addAll([
        "/css/bootstrap.css",
        "/css/main.css",
        "/css/soon.css",
        "/js/soon/custom.js",
        "/js/soon/jquery.themepunch.revolution.min.js",
        "/js/soon/plugins.js",
        "/js/bootstrap.min.js",
        "/js/jquery.min.js",
        "/js/modernizr.custom.js",
        "/js/respond.min.js"
      ]);
    })
  );
});

self.addEventListener('activate', function(event) {
  event.waitUntil(
    // Get all the cache names that we have.
    caches.keys().then(function(cacheNames) {
      return Promise.all(
        // Run through the cache names and for each, if the cache name is not our current cache delete it.
        cacheNames.map(function(cacheName) {
          if (cacheName !== mainCache) {
            return caches.delete(cacheName);
          }
        })
      );
    })
  );
});
In this case we load the cache up as usual, then the activate event gets fired and looks up the available cache names. If the cache name doesn’t match the current mainCache then it is deleted. Now, you can update the CSS, for example, change the version number of the mainCache and once the new Service Worker is activated it will clear out the old cache and cache all the current files in the new cache.
Stale while revalidate
The alternative saves remembering to update the Service Worker file every time a change is made and I like it for that reason. Rather than manage the whole cache at the same time, we can keep checking for updates to the file when we request it, but if we have the file in cache already, instantly return it. This gives us the benefit of the speedy Service Worker response and updates the file in the background ready for the next page load. Let’s implement this instead.
We don’t need the activate event for this, we just need to refactor our fetch event. Firstly, I’m going to bust out the anonymous function so that we can work with it directly. So our fetch event updates to look like this:
self.addEventListener("fetch", function(event) {
  const requestURL = new URL(event.request.url);

  if (/^(\/css\/|\/js\/)/.test(requestURL.pathname)) {
    event.respondWith(returnFromCacheOrFetch(event.request));
  }
});
Now we move our logic to the returnFromCacheOrFetch function.
function returnFromCacheOrFetch(request) {
  return caches.open(mainCache).then(function(cache) {
    return cache.match(event.request).then(function(cacheResponse) {
      return cacheResponse || fetch(request);
    });
  });
}
This already looks a bit like the callback hell that we were trying to avoid with Promises. We can refactor that first:
function returnFromCacheOrFetch(request) {
  // Open the cache
  const cachePromise = caches.open(mainCache);
  // Check whether the original request matches something in the cache
  const matchPromise = cachePromise.then(function(cache) {
    return cache.match(request);
  });

  // Use the result of both the above Promises to return the Response. Promise.all returns an array, but we destructure that in callback.
  return Promise.all([cachePromise, matchPromise]).then(function([cache, cacheResponse] {
    return cacheResponse || fetch(request);
  });
}
That flattens the callbacks out, but we haven’t changed the behaviour yet. Rather than just returning the cached response, we should make a fetch request any way and save the response in the cache.
function returnFromCacheOrFetch(request) {
  const cachePromise = caches.open(mainCache);
  const matchPromise = cachePromise.then(function(cache) {
    return cache.match(request);
  });

  return Promise.all([cachePromise, matchPromise]).then(function([cache, cacheResponse]) {
    // Kick off the update request
    const fetchPromise = fetch(request).then(function(fetchResponse) {
      // Cache the updated file and then return the response
      cache.put(request, fetchResponse.clone());
      return fetchResponse;
    }
    // return the cached response if we have it, otherwise the result of the fetch.
    return cacheResponse || fetchPromise;
  });
}
This time, instead of just returning the cached file if we have it, we make the call off to the request we wanted anyway and cache the response. If we have the cached response we still return it instantly, but if it updates then we will be serving the updated file from the cache next request.
Refresh the Service Worker and reload the app. Now make an update to your CSS. A reload doesn’t show the change, but a second refresh will show you the update. This technique is known as Stale While Revalidate and it keeps serving files as quick as possible, updating them in the background.
Caching without knowing the resource up front
The Stale While Revalidate method has actually given us an extra benefit. Since it reaches out to the network if the file isn’t present in the cache, we can use this to cache files that we want to look after with the Service Worker but don’t know the URL up front. The Days to Christmas countdown uses some Google Fonts and while we know the stylesheet URL, we don’t reliably know the URL for the font itself. Now we can look out for these files and cache them with the same function.
To do this, I’ve added one more cache so that we can manage the font cache differently to the main cache. sw.js should be updated to:
const mainCache = "dtc-cache";
const fontCache = "dtc-font-cache";

self.addEventListener("fetch", function(event) {
  const requestURL = new URL(event.request.url);

  if (/^(\/css\/|\/js\/)/.test(requestURL.pathname)) {
    event.respondWith(returnFromCacheOrFetch(event.request, mainCache));
  } else if (requestURL.hostname === "fonts.gstatic.com" || requestURL.hostname === "fonts.googleapis.com") {
    event.respondWith(returnFromCacheOrFetch(event.request, fontCache));
  }
});
Now we are caching the fonts once we’ve requested them and we’re checking for updates too.
This all seems fairly bread and butter for Service Workers so far. Keeping files offline is what they are good at. We can use this network intercept for some more interesting ideas.
Timing out third party scripts
One thing that can have an effect on the total load time of your pages lie outside of your control. Third party scripts can take a long time to load and result in jarring page experiences. Widgets or adverts can be the cause of this, so I’m going to show you how to take charge of this using the Service Worker.
Consider if I wanted to monetise Days to Christmas with some adverts. If the advertiser I went with wasn’t performance focused then I might end up with slow page loads. I’m going to simulate that here and see what we can do about it. The Node.js server has an /advert endpoint that sleeps for 5 seconds and then returns. I have a script element at the bottom of the page that just calls off to /advert, when the page loads you can see the 5 second delay in the dev tools Network tab.
Let’s use our Service Worker to time out this request to a more reasonable half a second.
We need to add another conditional to our fetch event:
self.addEventListener("fetch", function(event) {
  const requestURL = new URL(event.request.url);

  if (/^(\/css\/|\/js\/)/.test(requestURL.pathname)) {
    event.respondWith(returnFromCacheOrFetch(event.request, mainCache));
  } else if (requestURL.hostname === "fonts.gstatic.com" || requestURL.hostname === "fonts.googleapis.com") {
    event.respondWith(returnFromCacheOrFetch(event.request, fontCache));
  } else if (requestURL.pathname === "/advert") {
    event.respondWith(timeoutRequest(event.request));
  }
});
Now we need to define the timeoutRequest function. This is slightly easier said than done as the fetch API doesn’t currently support timing out requests or aborting requests (though there is heated discussion over the matter over on GitHub). We can fake it and still gain the benefit though.
We define a Promise that resolves after half a second using setTimeout. Then we race that promise against a fetch to the original resource, returning a response based on the outcome.
function timeoutRequest(request) {
  // Create a timeout Promise using setTimeout
  const timeoutPromise = new Promise(function(resolve) {
    setTimeout(resolve, 500);
  });

  // load is the original request, here using fetch
  const load = fetch(request);

  // We race the two promises, if the timeout wins, then we return our own Response, otherwise the fetch Response is returned.
  return Promise.race([timeoutPromise, load]).then(function(winner) {
    if (winner instanceof Response) {
      return winner;
    } else {
      return new Response('');
    }
  });
}
In this case both Responses will be empty (I don’t really have adverts on the countdown), but we can see the difference in the page load time. What you do with this Response depends on what you want to timeout against. If it’s a third party widget, you might be able to ignore the return, if it’s an advert then perhaps you’d want to cache old responses and serve them up instead.
Notably, since we can’t abort the fetch, this will still go through the whole 5 second load for the original request, but this will happen in the background context of the Service Worker and not affect the page load time.
Fancy image formats
You might have noticed that the jpegs in the application are fairly large. They need to be as they cover the background of the site. This is not good for our page loads though. Thankfully we are in a golden age of site performance and researchers have been producing image formats with much better compression. Sadly, as with most things in browsers, we’ve had to wait until all the major browsers catch up before we can start using these shiny new things.
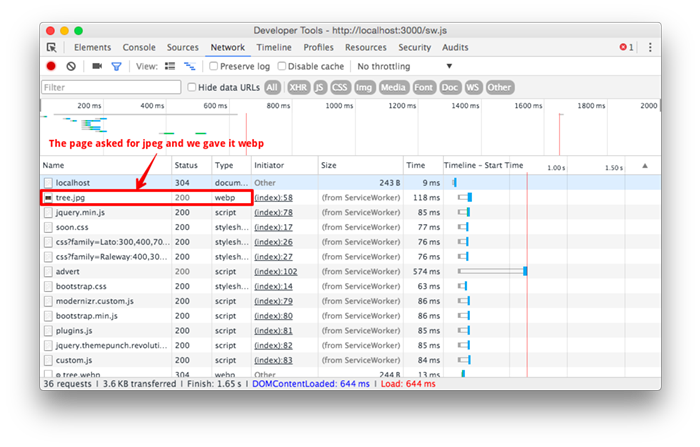
With a Service Worker however, we can jump in and return images in a different format if the browser accepts them. So let’s do that!
I converted my jpegs to webp images and was hugely surprised by the result. The images came out between 20 and 35% of the size of the original jpegs. I converted the images using the excellent Pixelmator, but you can also use the webp command line tool.
Now we need to intercept any request for a jpeg, check if the browser supports the webp format and return the correct image.
One more line for our fetch event:
self.addEventListener("fetch", function(event) {
  const requestURL = new URL(event.request.url);

  if (/^(\/css\/|\/js\/)/.test(requestURL.pathname)) {
    event.respondWith(returnFromCacheOrFetch(event.request, mainCache));
  } else if (requestURL.hostname === "fonts.gstatic.com" || requestURL.hostname === "fonts.googleapis.com") {
    event.respondWith(returnFromCacheOrFetch(event.request, fontCache));
  } else if (requestURL.pathname === "/advert") {
    event.respondWith(timeoutRequest(event.request));
  } else if (/^\/images.*\.(jpg|png)$/.test(requestURL.pathname)) {
    event.respondWith(returnWebpOrOriginal(event.request));
  }
});
And now we define returnWebpOrOriginal.
function returnWebpOrOriginal(request) {
  // Start by assuming the browser doesn't support webp
  let supportsWebp = false;

  // If the request's Accept header contains "webp" then we can assume the browser will happily deal with a webp file.
  if (request.headers.has('accept')) {
    supportsWebp = request.headers.get('accept').includes('webp');
  }

  if (supportsWebp) {
    // If we support webp then adjust the URL to ask for the webp file
    const webpUrl = request.url.replace(/(jpg|png)$/, "webp");
    // Then use fetch to return the webp file
    return fetch(webpUrl).then(function(response) {
      // If not all the images have been converted then we fallback to requesting the original file.
      return response.status === 404 ? fetch(request) : response;
    });
  } else {
    // If the browser doesn't support webp, just fetch the original request.
    return fetch(request);
  }
}
If we refresh the Service Worker one more time, we can see that the images now get served from the worker and that they’re format is webp, decreasing the size of the page successfully.
This trick was borrowed from Dean Hume, who goes into greater detail about how it is implemented and compares it against using the
All together now
Now we’ve put all our Service Worker improvements in place, what are the benefits? Like I said, these won’t occur on the initial page load but, if we run the before and after versions of the app through WebPageTest, we can look at the effect on the second page load.
For comparison, here’s what happened before the Service Worker was added. I tested over 3G and Cable speeds to see the impact.

When loading over 3G, first page load took 11.926 seconds. Event the slow loading /advert script didn’t factor into the eventual load time. On the second load was 8.319 seconds, fairly slow and quite dominated by the fake external script.

Over a cable connection things were much faster and much more dominated by the 5 second load time for the script. First load was 5.886 seconds and second load a not much quicker 5.613 seconds. However discounting our slow script load, you can see the the first page load was done by the last loaded image at about 3.1 seconds and the second load after just over a second.
Now let’s see what the Service Worker could do.

Once again, the first load over 3G took 12.170 seconds, but on the second load you can see a bunch of “(request canceled)” as the Service Worker took over. The load time for the second page load was 5.514 seconds as all the static assets completed within milliseconds. It looks to me as though WebPageTest was unable to catch the webp images that we included, but still measured the full time for them to reach the page, explaining the time that we see.

On a cable connection with the Service Worker the first view took 5.891 seconds and the second view a mere 1.663 seconds.
Gifts from the Service Worker
I’m pretty pleased with the results achieved in using a Service Worker to enhance performance. I’d like to note that if you do decide to use any of the techniques here or develop your own Service Worker enhancements that you should always, always test against your own circumstances. There are no silver bullets in this world, but one or more of these ideas may well help.
If anything, I hope I’ve inspired you to hack around a bit more with Service Workers to see what they can do for you. If you are interested check out:
- Jake Archibald’s offline cookbook
- Mozilla’s Service Worker cookbook and this blog post with greater details on some of the hacks
- The web is getting pushy a talk I gave about using Service Workers to provide push notifications on the web
- And don’t forget the completed application and particular the Service Worker file for this project.
I really hope this has been useful, if you do have any ideas or other hacks you’ve done with Service Workers I’d love to hear about them. Either drop me a comment below or give me a shout on Twitter or by email.